Category: Reference

Making a Podcast, Step 2: Gather your recording equipment

Note: This post is third in a series where I share what I’ve learned starting and producing the Recompiler podcast. If you haven’t already, start with the introduction. This post follows Step 1: Identify a Topic, Point of View, and Structure.


Step 2: Gather your recording equipment: Computer, microphone, audio interface, headphones for monitoring.

There are numerous ways to record and produce podcasts. Not unlike photography, you can put together a digital recording rig for very little or you can spent thousands  or tens of thousands of dollars on expensive, high-end gear. I recommend that for your first podcast endeavor, you get the best quality gear you can comfortably afford. If you end up doing a lot of podcasting, and find a way to fund it, you’ll surely want to upgrade your equipment. And by then, you’ll have more experience to guide you.

Below I give an overview of what you’ll need and explain what I picked for the Recompiler. For a more detailed guide, check out Transom’s excellent Podcasting Basics, Part 1: Voice Recording Gear.

Computer or portable recorder too?

First, you’ll need to decide how you’ll be recording your audio: via a computer or a portable recorder. If you’ll mostly be doing field interviews or otherwise traveling a lot, a portable recorder might make sense. The downside is that you’ll still need a way to edit and publish your podcast and that requires a computer. For the Recompiler, I first thought I’d be doing a lot of field recording so I picked up a Sony PCM-M10 ($200 at the time). While I use it for other things, I haven’t ended up using it much for the podcast. Instead, I record at my desk directly into my refurbished MacMini. The good news is that you don’t need a high-end machine to record and edit podcast audio. There’s a good chance that a computer you already have available to you will be sufficient. And, audio recording and editing software is available for Windows, macOS, and Linux.

Microphone and audio interface

Being an audio medium, you’ll need to have a way to record audio. Most all modern computers have microphones built in. You can certainly start with whatever you have available to you. If you can’t afford to buy anything new, and you are ready to get started, don’t let the lack of an upgraded microphone stop you. A smart phone is also another good getting started option, especially if you have an iPhone. Most portable digital audio recorders have microphones built in as well.

However, if you do have a couple hundred bucks to spend, I recommend getting a better external microphone along with an audio interface.

External microphones generally connect via USB or XLR. Some have both. If the microphone has USB, you connect it directly to your computer with a USB cable like you would an external hard drive or non-wifi printer. If the microphone has XLR, you need an audio interface between the microphone and the computer. The microphone connects to the audio interface via an XLR cable, and the audio interface connects to the computer with a USB cable. The XLR setup is overall more complicated and more expensive, but generally provides better quality.

There are several USB microphones aimed at first-time podcasters. When I recorded In Beta, I used a refurbished Blue Yeti. I did not get the best of results. 5×5 nearly always complained about my audio quality. And, in general, I’ve had trouble with USB-based microphones, where I often have a ground-loop hum, which everyone but me can hear. As with all things, YMMV. Some folk swear by the Yeti, and other USB products from Blue. Rode also makes a USB microphone, but it’s more expensive than Blue’s offerings.

Having given up on USB microphones by the time we were planning the Recompiler, I looked for an affordable XLR solution. I settled on the Electro-Voice RE50N/D-B, a hand-held high-dynamic microphone with the Focusrite Scarlett 2i2 audio interface. My choice of microphone was based on: price (was in my budget), ability to use it in the field as well as in the “studio”, and that it would work with my chosen audio interface without extra equipment. I don’t recall how I settled on the Focusrite. I think it was a combination of a recommendation via Twitter, price, and brand (Focusrite seemed well-known and dependable). I’m happy with both choices. The Scarlett 2i2 worked right away without fuss and I get decent sound from the RE50N/D-B in a variety of environments.

If you’re just getting started, I definitely recommend the Focusrite Scarlett 2i2 ($150 new) if you want to be able to record a guest or other audio source in studio, or the Scarlett Solo ($100 new) if you just need to record from one audio source. Look on eBay for used equipment to save money.

As far as microphone, there are too many options and preferences for me to feel comfortable giving a specific recommendation. If you’re just starting out, I recommend reading through reviews on transom.org and then getting the best microphone you can comfortably afford, knowing that it won’t be the last mic you buy if you stick with podcasting.

Other accessories

Unless you’re doing field interviews exclusively, you’ll need to get something to hold your microphone. This can be a tabletop or floor stand, or a desk-mounted arm. You might also want to include a pop filter and/or a shock mount. The Transom article I first mentioned earlier gives a good overview of options for these.

For the Recompiler, I use the RODE PSA1 ($100) as a microphone mount and the simple foam microphone cover that came with the RE50N/D-B. I haven’t needed a shock mount because, I think, the RE50N/D-B is designed as a hand-held mic and doesn’t pick up a lot of vibration. I’m also careful not to bump it, the mic boom, or my desk while I’m recording.

Headphones

Don’t forget to get and use a decent pair of headphones while you’re recording and editing your podcast audio.

For the Recompiler, I picked up a pair of Sennheiser HD 202 II ($25) which are dedicated to audio recording and editing. In fact, they never leave my desk. That way I’m never scrambling to find them when it’s time to work. The Sennheisers I have aren’t amazingly awesome, but they were inexpensive and get the job done.

Whatever you pick, aim for headphones designed for studio monitoring, that are over-the-ear, do not have active noise cancellation, and do not have a built-in mic. If you do end up using headphones with a built-in mic, double-check that you are not recording audio from that mic. There’s nothing more disappointing that recording a whole segment or show only to realize you used your crappiest microphone.

If you have it in your budget, you might consider the Sony MDRV6 ($99).

Questions or comments?

Please get in touch or leave a comment below if you have questions, comments, or just want encouragement!

Next post…

Stay tuned for the next post in this series!

Making a Podcast, Step 1: Identify a Topic, Point of View, and Structure

Note: This post is second in a series where I share what I’ve learned starting and producing the Recompiler podcast. If you haven’t already, start with the introduction


Your first step in making a new podcast is to identify a topic, point of view, and structure for your podcast.

This sounds simple, but it’s helpful to think about at the beginning, to record your answers in writing, and to refer back to them often and your podcast matures.

For the Recompiler, the general topic (technology) and point of view (feminist; beginner-friendly) was already defined via Audrey’s clear vision for the written version:

The Recompiler is a feminist hacker magazine, launched in 2015. Our goal is to help people learn about technology in a fun, playful way, and highlight a diverse range of backgrounds and experiences. We’re especially interested in infrastructure: the technical and social systems we depend on. We want to share what it’s like to learn and work with technology, and teach each other to build better systems and tools.

As far as structure, early on, we decided that episodes would feature a mix of Audrey and me talking about tech news and other timely topics, along with interviews of Recompiler contributors and other “subject-matter experts.” I put “subject-matter experts” in quotes because I intentionally look for folks from a wide range of backgrounds and experiences, many of which might not be considered “experts” by mainstream tech.

We also decided that the Recompiler would have a casual, unscripted structure. We don’t currently broadcast live (although we might in the future). I do minimal editing, focusing mostly on making episodes listenable, rather than having a particular narrative arc. The order of what you hear is most likely the order in which we recorded, with inaudible or otherwise disruptive segments removed.

We aim for episodes to be about an hour long. Episodes always include two people: myself and Audrey, or myself and the person I’ve interviewed. Our target publishing frequency has changed as I’ve become more comfortable with the production process. First our goal was monthly, then twice a month, and now weekly. We don’t always meet this goal, but we’re getting better at it.

How did we make these decisions about structure? Mostly based on my constraints, both in terms of skill and time (both limited), as well as my personal preferences in terms of what I enjoy in podcasts.

To summarize, in thinking about your new podcast, you’ll need to decide:

  • general topics to focus on
  • point of view
  • structure
    • casual or scripted
    • number of hosts and guests per episode
    • target length in minutes
    • whether or not to broadcast live
    • frequency of publishing

The decisions you make regarding structure will determine the resources you need to produce a completed episode. For example, a heavily scripted show will require more audio engineering skill and editing time.

Questions or comments?

Please get in touch or leave a comment below if you have questions, comments, or just want encouragement!

Next post…

The next post in this series is: Making a Podcast, Step 2: Gather your recording equipment.


Making a Podcast, Intro: A Year of Producing the Recompiler

The first episode of the Recompiler podcast posted on February 4, 2016. This means I’ve had nearly a year of experience producing a podcast and in a series of posts, I’d like to share what I’ve learned.

Unlike with In Beta, a podcast I co-hosted with Kevin Purdy, I am responsible for the entire production of the Recompiler podcast: content development, booking, interviewing, audio engineering (recording and editing), publication, and promotion. With In Beta, I was just a host, responsible for developing content, performing the show, interviewing guests, and writing show notes. Staff from 5by5, the network to which In Beta belongs, did all the other audio engineering tasks and already had a publishing and marketing platform in place.

In truth, figuring out how to do the audio engineering was my biggest obstacle to creating the Recompiler podcast. It’s why there was a several months-long gap between our announcement about the podcast and our first episode.

Looking back, of course, many of the things that seemed overwhelming at the time are now routine. In the next series of posts, I share what I’ve learned. In doing so, I hope to encourage any of you who are interested in making your own podcast and give you to concrete tips for getting started.

Next up: Making a Podcast, Step 1: Identify a Topic, Point of View, and Structure.

Some OpenID Providers

While I don’t hear about it a lot recently these days, there are still some sites that I need OpenID to log in to. I had been using myOpenID from Janrain for this, but that service was retired. Unfortunately, So was my backup provider, ClaimID.

So, I went shopping for new providers! Here’s what I found:

Whatever OpenID provider you have, I highly suggest setting up delegation. OpenID delegation means you can use any website you control as your OpenID login. The delegate website is configured to use your chosen provider and you can switch anytime without having to update your login information on other sites.

How do you set up delegation? It’s easy! You just have to add the following two lines to the head of the site you want to act as delegate:

<link rel="openid.delegate" href="http://mywebsite.com/" />
<link rel="openid.server" href="https://myopenidprovider.com/" />

Replacing “mywebsite.com” with the site you want to act as delegate, and “myopenidprovider.com” with your chosen OpenID provider (e.g., openid.stackexchange.com). Make sure you have an account at the OpenID provider of your choice before doing this.

If you have a self-hosted WordPress blog, you can use this plugin instead of editing your theme files.

Thanks Aaron Parecki, Nicolas Ward, and Sumana Harihareswara ‏ for helping me compile this list. Know of an OpenID provider not already on the list above? Let me know in the comments!

Ideas for better scheduling

Recently I’ve been thinking a lot about how to make more time for meaningful project work as well as for rest. One way to free up time has been to significantly reduce the number of meetings I attend and facilitate, and to make those meetings as efficient as possible when I do attend.

This post focuses specifically on better scheduling techniques. If you find it useful, you might also find Strategies for Facilitating Better Meetings useful.

Idea 1: Only schedule meetings when there are no other effective options.

Meetings take up a lot of time. An hour long meeting doesn’t just take an hour, it takes an hour per person who attends the meeting. There’s also an opportunity cost associated with meetings. When you’re in meetings, you aren’t getting any other work done. The opportunity cost is multiplied if you have work that that requires long blocks of uninterrupted time. On days where I an hour of free time interspersed between meetings are days where I completed nothing but superficial tasks.

In general, always aim for fewer meetings. Before scheduling a meeting, ask yourself what the goal of the meeting is, and can that goal be accomplished in another, preferably asynchronous way.

There’s a caveat to this idea, however. If while discussing a topic in an asynchronous channel and you realize going round and round without progress or are otherwise not making progress, it’s time to move to a synchronous channel. This might be a video or telephone call or an IRC chat.

Idea 2: Schedule the shortest meeting possible.

Think about your goal, the number of people attending and then pick a meeting length accordingly. Many people default to hour long meetings for no other reason than it’s the default of many calendaring tools, and we’re used to thinking in full-hour increments. Take a look at your agenda. Do you need a full hour to get through it? Would 30 or 45 minutes work instead? Treat people’s time as the valuable and finite thing that it is and only ask for what you absolutely need.
zimbra default appt duration

Idea 3: Use a calendar tool to create and send a meeting invite.

Zimbra, Thunderbird via Lightning, iCal, Google Calendar, Outlook. Most email clients have this built in, so you shouldn’t have to think too hard and nor should your recipients. If you’re self-hosting email or on an otherwise non-mainstream hosted email, you probably have enough technical savvy to figure out how to send a calendar invite. Why? For those of us who live and die by our calendars, if something is not on there, it isn’t happening. Or it is, but I don’t need to know about it. Sending a calendar invite bypasses my often overwhelmed email queue and gives me the opportunity to respond in a routinized way without having to get to inbox zero.

Idea 4: Only invite those who really need to attend.

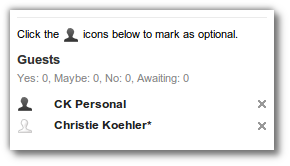
Call out attendees who are truly optional (many calendar tools have this feature, if not, use the invite body). Your agenda should give an good indication to invited attendees why they need to attend. Keep an eye out for acceptances and declines and follow-up accordingly. Don’t wait until the meeting has started to try and track down a necessary participant who didn’t respond to your meeting invite.

optional attendee field in Zimbra
optional attendee field in Google Calendar

Idea 5: Manage large, group meetings using shared calendars instead of individual invites.

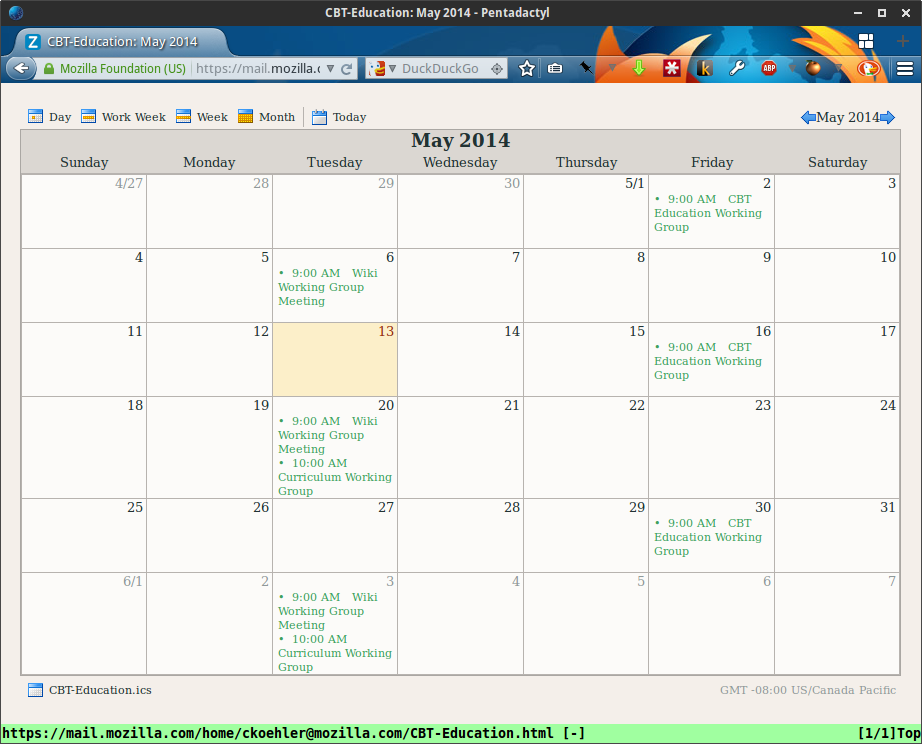
In the case of large, group meetings, I recommend using shared calendars instead of sending invitations to individuals or even groups of individuals. These work best for meetings where attendance is medium to very large, attendance is optional and variable, and the content of the meetings are largely updates with room for discussion. Using shared calendars allows people to subscribe to the calendars of events or groups for which they are interested in participating and gives them control over how to manage that information in their own calendars. With a shared calendar, a person can toggle visibility and choose whether or not those appointments will affect their free/busy status without having to respond to individual invites.

Public, shared calendar for CBT Education Working Group

Idea 6: Share your own calendar whenever possible

Sharing your own calendar allows others to initiate meetings with you without having to go back and forth via email asking ‘what time is good.’ Doodle and other websites accomplish similar things, but take time to setup. If you share your calendar publicly and let people know about it, they can compare it with their own schedules and send an invite for a time that seems to work for both of you. If the time doesn’t actually work for you, you can decline or respond suggesting a new time. You won’t necessarily eliminate the back-and-forth with this method, but at least you’re a step closer. When someone sends you an invite, your time is blocked as tentative and there’s less of a chance you’ll be booked for something just after you’ve told someone via email you were free at that time.

What about privacy? Most calendars allow you to set not only the visibility of individual appointments (private vs public), but also to what extent you share the details of your calendar. Here’s what my public calendar , which is a combination of my personal and work calendars, looks like:

My public calendar
My public calendar

I’ve chosen to share only the free/busy status of my calendar, so all you see are blocks of time say ‘busy’ and ‘tentative’ depending on how I’ve responded to appointments. For me, this is a good mix of privacy vs the convenience of easier scheduling with other people.

Idea 7: Respond to meeting invites timely and accordingly

Whenever possible, respond to meeting invites timely and accordingly. This means accepting, declining or tentatively accepting invites that you receive. What constitutes ‘timely’ here is contextual. When I receive the initial invitation for a regular recurring meeting, I either accept all as tentative (thus blocking my schedule) or do nothing. Then at the beginning of each week, I look 2-3 weeks ahead and make sure I’ve either accepted or declined according to my availability. For meetings happening on the same day as I receive the invite, I try to accept or decline as soon as I see the invitation. For meetings happening within the week, I try to respond the same day I receive the invite. If I don’t know whether or not I can attend, I respond with a tentative acceptance and often provide the reason or a clarifying question: “I most likely have a conflict at this time, but could potentially move it. How important am I to this discussion?”

What are you strategies?

What strategies do you have to make scheduling easier, better, more productive? Leave them in the comments. Or tweet at me.

Creating an “Open Planning Checklist” – your feedback wanted

As part of the community building education efforts I’m leading at Mozilla, I’ve created a draft of an open planning checklist. The inspiration for the current content comes from our book Community Event Planning. I’ve modified it somewhat to be more Mozilla-specific.

This is meant to be a quick reference, one that project leaders can read and understand quickly, and reference as they set up their projects.

Please take a look at the draft on WikiMo and let me know what you think. For best collaboration, leave your comments directly on that wiki page. Otherwise leave a comment here on the blog, or visit my Mozillians profile for the best way to get in touch.

An Explanation of the Heartbleed bug for Regular People

I’ve put this explanation together for those who want to understand the Heartbleed bug, how it fits into the bigger picture of secure internet browsing, and what you can do to mitigate its affects.

HTTPS vs HTTP (padlock vs no padlock)

When you are browsing a site securely, you use https and you see a padlock icon in the url bar. When you are browsing insecurely you use http and you do not see a padlock icon.

Firefox url bar for HTTPS site (above) and non-HTTPS (below).

HTTPS relies on something called SSL/TLS.

Understanding SSL/TLS

SSL stands for Secure Sockets Layer and TLS stands for Transport Layer Security. TLS is the later version of the original, proprietary, SSL protocol developed by Netscape. Today, when people say SSL, they generally mean TLS, the current, standard version of the protocol.

Public and private keys

The TLS protocol relies heavily on public-key or asymmetric cryptography. In this kind of cryptography, two separate but paired keys are required: a public key and a private key. The public key is, as its name suggests, shared with the world and is used to encrypt plain-text data or to verify a digital signature. (A digital signature is a way to authenticate identity.) A matching private key, on the other hand, is used to decrypt data and to generate digital signatures. A private key should be safeguarded and never shared. Many private keys are protected by pass-phrases, but merely having access to the private key means you can likely use it.

Authentication and encryption

The purpose of SSL/TLS is to authenticate and encrypt web traffic.

Authenticate in this case means “verify that I am who I say I am.” This is very important because when you visit your bank’s website in your browser, you want to feel confident that you are visiting the web servers of — and thereby giving your information to — your actual bank and not another server claiming to be your bank. This authentication is achieved using something called certificates that are issued by Certificate Authorities (CA). Wikipedia explains thusly:

The digital certificate certifies the ownership of a public key by the named subject of the certificate. This allows others (relying parties) to rely upon signatures or assertions made by the private key that corresponds to the public key that is certified. In this model of trust relationships, a CA is a trusted third party that is trusted by both the subject (owner) of the certificate and the party relying upon the certificate.

In order to obtain a valid certificate from a CA, website owners must submit, at minimum, their server’s public key and demonstrate that they have access to the website (domain).

Encrypt in this case means “encode data such that only authorized parties may decode it.” Encrypting internet traffic is important for sensitive or otherwise private data because it is trivially easy eavesdrop on internet traffic. Information transmitted not using SSL is usually done so in plain-text and as such clearly readable by anyone. This might be acceptable for general internet broswing. After all, who cares who knows which NY Times article you are reading? But is not acceptable for a range of private data including user names, passwords and private messages.

Behind the scenes of an SSL/TLS connection

When you visit a website with HTTPs enabled, a multi-step process occurs so that a secure connection can be established. During this process, the sever and client (browser) send messages back and forth in order to a) authenticate the server’s (and sometimes the client’s) identity and, b) to negotiate what encryption scheme, including which cipher and which key, they will use for the session. Identities are authenticated using the digital certificates mentioned previously.

When all of that is complete, the secure connection is established and the server and client send traffic back and forth to each other.

All of this happens without you ever knowing about it. Once you see your bank’s login screen the process is complete, assuming you see the padlock icon in your browser’s url bar.

Keepalives and Heartbeats

Even though establishing an ssl connection happens almost imperceptibly to you, it does have an overhead in terms of computer and network resources. To minimize this overhead, network connections are often kept open and active until a given timeout threshold is exceed. When that happens, the connection is closed. If the client and server wish to communicate again, they need to re-negotiate the connection and re-incur the overhead of that negotiation.

One way to forestall a connection being closed is via keepalives. A keepalive message is used to tell a server “Hey, I know I haven’t used this connection in a little while, but I’m still here and I’m planning to use it again really soon.”

Keepalive functionality was added to the TLS protocol specification via the Heartbeat Extension. Instead of “Keepalives,” they’re called “Heartbeats,” but they do basically the same thing.

Specification vs Implementation

Let’s pause for a moment to talk about specifications vs implementations. A protocol is a defined way of doing something. In this case of TLS, that something is encrypted network communications. When a protocol is standardized, it means that a lot of people have agreed upon the exact way that protocol should work and this way is outlined in a specification. The specification for TLS is collaboratively developed, maintained and promoted by the standards body Internet Engineering Task Force (IETF). A specification in and of itself does not do anything. It is a set of documents, not a program. In order for a specifications to do something, they must be implemented by programmers.

OpenSSL implementation of TLS

OpenSSL is one implementation of the TLS protocol. There are others, including the open source GnuTLS as well as proprietary implementations. OpenSSL is a library, meaning that it is not a standalone software package, but one that is used by other software packages. These include the very popular webserver Apache.

The Heartbleed bug only applies to webservers with SSL/TLS enabled, and only those using specific versions of the open source OpenSSL library because the bug relates to an error in the code of that library, specifically the heartbeat extension code. It is not related to any errors in the TLS specification or and in any of the underlying ciper suites.

Usually this would be good news. However, because OpenSSL is so widely used, particularly the affected version, this simple bug has tremendously reach in terms of the number of servers and therefor the number of users it potentially affects.

What the heartbeat extension is supposed to do

The heartbeat extension is supposed to work as follows:

  • A client sends a heartbeat message to the server.
  • The message contains two pieces of data: a payload and the size of that payload. The payload can by anything up to 64kb.
  • When the server receives the heartbeat message, it is to add a bit of extra data to it (padding) and send it right back to the client.

Pretty simple, right? Heartbeat isn’t supposed to do anything other than let the server and client know they are each still there and accepting connections.

What the heartbeat code actually does

In the code for affected versions (1.0.1-1.0.1f) of the OpenSSL heartbeat extension, the programmer(s) made a simple but horrible mistake: They failed to verify the size of the received payload. Instead, they accepted what the client said was the size of the payload and returned this amount of data from memory, thinking it should be returning the same data it had received. Therefore, a client could send a payload of 1KB, say it was 64KB and receive that amount of data back, all from server memory.

If that’s confusing, try this analogy: Imagine you are my bank. I show up and make a deposit. I say the deposit is $64, but you don’t actually verify this amount. Moments later I request a withdrawal of the $64 I say I deposited. In fact, I really only deposited $1, but since you never checked, you have no choice but to give me $64, $63 of which doesn’t actually belong to me.

And, this is exactly how a someone could exploit this vulnerability. What comes back from memory doesn’t belong to the client that sent the heartbeat message, but it’s given a copy of it anyway. The data returned is random, but would be data that the OpenSSL library had been storing in memory. This should be pre-encryption (plain-text) data, including your user names and passwords. It could also technically be your server’s private key (because that is used in the securing process) and/or your server’s certificate (which is also not something you should share).

The ability to retrieve a server’s private key is very bad because that private key could be used to decrypt all past, present and future traffic to the sever. The ability to retreive a server’s certificate is also bad because it gives the ability to impersonate that server.

This, coupled with the widespread use of OpenSSL, is why this bug is so terribly bad. Oh, and it gets worse…

Taking advantage of this vulnerability leaves no trace

What’s worse is that logging isn’t part of the Heartbeat extension. Why would it be? Keepalives happen all the time and generally do not represent transmission of any significant data. There’s no reason to take up value time accessing the physical disk or taking up storage space to record that kind of information.

Because there is no logging, there is no trace left when someone takes advantage of this vulnerability.

The code that introduced this bug has been part of OpenSSl for 2+ years. This means that any data you’ve communicated to servers with this bug since then has the potential to be compromised, but there’s no way to determine definitively if it was.

This is why most of the internet is collectively freaking out.

What do server administrators need to do?

Server (website) administrators need to, if they haven’t already:

  1. Determine whether or not their systems are affected by the bug. (test)
  2. Patch and/or upgrade affected systems. (This will require a restart)
  3. Revoke and reissue keys and certificates for affected systems.

Furthermore, I strongly recommend you enable Perfect forward secrecy to safeguard data in the event that a private key is compromised:

When an encrypted connection uses perfect forward secrecy, that means that the session keys the server generates are truly ephemeral, and even somebody with access to the secret key can’t later derive the relevant session key that would allow her to decrypt any particular HTTPS session. So intercepted encrypted data is protected from prying eyes long into the future, even if the website’s secret key is later compromised.

What do users (like me) need to do?

The most important thing regular users need to do is change your passwords on critical sites that were vulnerable (but only after they’ve been patched). Do you need to change all of your passwords everywhere? Probably not. Read You don’t need to change all your passwords for some good tips.

Additionally, if you’re not already using a password manager, I highly recommend LastPass, which is cross-platform and works on pretty much every device. Yesterday LastPass announced they are helping users to know which passwords they need to update and when it is safe to do so.

If you do end up trying LastPass, checkout my guide for setting it up with two-factor auth.

Further Reading


If you like visuals, check out this great video showing how the Heartbleed exploit works.

If you’re interested in learning more about networking, I highly recommend Ilya Grigorik‘s High Performance Browser Networking, which you can also read online for free.

If you want some additional technical details about Heartbleed (including actual code!) checkout these posts:

Oh, and you can listen to Kevin and I talk about Heartbleed on In Beta episode 96, “A Series of Mathy Things.”

Conclusion

VidyoDesktop 2.2.x on Linux with PulseAudio 4.0 (Ubuntu 13.10)

Recently I upgraded my work laptop from Xubuntu 13.04 to 13.10. The upgrade went well, except for an issue with audio output from VidyoDesktop. Every other application worked fine. Skype, audio from Flash inside both Firefox and Chromium, gmusicbrower, Rhythmbox, and the system sounds all performed as expected.

After spending a day spelunking the depths of PulseAudio, a co-worker pointed me to this bug report which links to this blog post about making Skype compatible with changes in PulseAudio 4.0.

I confirmed that manually starting Vidyo with the following command re-enabled audio:

PULSE_LATENCY_MSEC=60 VidyoDesktop

And then modified the Exec line in /etc/xdg/autostart/vidyo-vidyodesktop.desktop to this:

Exec=env PULSE_LATENCY_MSEC=60 VidyoDesktop -AutoStart

The non-autostart menu file (/usr/share/applications/vidyo-vidyodesktop.desktop) just needs the following:

Exec=env PULSE_LATENCY_MSEC=60 VidyoDesktop

We’re using version 2.2.x of the VidyoDesktop client, which I believe has been superseded and so you may not need this fix at if you use a later client version.