What is BitlBee?
BitlBee enables you to connect to chat networks and Twitter via an IRC client and interact with those chat networks in the same way you interact with IRC.
Why would you want to do this? Aside from being neat, being able to connect to chat and twitter with your IRC client means there are fewer programs you have to run and keep track of and it enables you to use the keyboard to issue commands instead of the GUI.
Installation on Ubuntu
This post explains how to build BitlBee from source on the most recent Ubuntu LTS (12.04 Precise). There are packages for BitlBee, but they aren’t up to date.
Note: These instructions are for a single-user setup of BitlBee. If you are installing a server for multiple users, especially ones you don’t know well, please read the documentation to be sure you understand what you are doing and are selecting the most secure options.
Dependencies
You’ll need to make sure the following packages are installed on your system: build-essential, libglib2.0-dev. Additionally, you’ll need an ssl library and I recommend libgnutls-dev (over openssl, which can be problematic). And if you want to support off-the-record chat, you’ll need libotr2-dev.
You can install all of those with:
sudo apt-get install build-essential libglib2.0-dev libgnutls-dev libotr2-dev
Download, configure, and make source and install
wget http://get.bitlbee.org/src/bitlbee-3.2.tar.gz
tar -xzvf bitlbee-3.2.tar.gz
cd bitlbee-3.2
./configure --otr=1 --msn=1 --jabber=1 --oscar=1 --twitter=1 --yahoo=1 --ssl=gnutls --etcdir=/etc/bitlbee
make
sudo make install
The configure included above specify the following:
- inclusion of msn, jabber, oscar (AOL), yahoo, and twitter protocols
- enable OTR (off-the-record messaging)
- gnutls as the ssl library
- location of configuration directory as /etc/bitlbee
Configure BitlBee
Next you’ll need to configure Bitlbee for use.
First, create and then edit the sample conf file:
sudo make install-etc
sudo vim /etc/bitlbee/bitlbee.conf
Here are the important options to set:
- RunMode: How the bitlbee server should run. Options include: Inetd, Daemon, ForkDaemon.
- User: The user that bitlbee server should run as. bitlbee makes sense here.
- DaemonInterface: Which network interface to use. The default should be fine.
- DaemonPort: Which port to use. The default should be fine unless you’re already using it for IRC or ZNC (bouncer).
- AuthMode: I recommend setting this to Open and then to Registered after you’ve registered yourself.
- AuthPassword: Needed to login to closed systems. Generate a hashed password with bitlbee -x hash
. - OperPassword: Unlocks operator commands. Generate a hashed password (see previous bullet).
- ConfigDir: Make sure this is the same thing specific in the configure option. In this example, it’s /etc/bitlbee.
Here are the example conf directives:
RunMode = ForkDaemon
User = bitlbee
DaemonInterface = 0.0.0.0
DaemonPort = 6667
AuthMode = Open
AuthPassword = md5:SECRET_HASH
OperPassword = md5:SECRET_HASH
ConfigDir = /etc/bitlbee
Add bitlbee user
Now you need to create that system user and make sure it can read the conf file:
sudo adduser --system bitlbee
sudo chmod -R +r /etc/bitlbee
Start the server
Now run the server:
sudo bitlbee -c /etc/bitlbee/bitlbee.conf
Usage
Connect with your IRC client
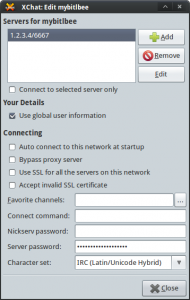
Open your IRC client and add the bitlbee server just as you would any IRC server. Here’s what it looks like in X-Chat:

Server password will be whatever you put for AuthPassword in your bitlbee.conf. It doesn’t matter what you have for nickname, user name or real name. These will be used when you register with bitlbee.
Register your user
register <password>
You should then see
<@root> Account successfully created
On subsequent sign ins you’ll need to identify just like you do with NickServ:
identify <password>
Now that you’ve registered your user, it’s a good idea to change AuthMode to Registered in your bitlbee.conf.
Setup your accounts
When you first start BitlBee, you won’t have any chat or Twitter accounts so you’ll need to set them up.
<@christiek> account list
<@root> No accounts known. Use `account add' to add one.
So let’s setup gtalk:
<@christiek> account add jabber myemail@gmail.com
<@root> Account successfully added with tag gtalk
<@root> You can now use the /OPER command to enter the password
<@root> Alternatively, enable OAuth if the account supports it: account gtalk set oauth on
<@christiek> account gtalk set oauth on
<@root> oauth = `on'
Now the gtalk account is configured, but it isn’t turned on:
<@christiek> account list
<@root>  0 (gtalk): jabber, christiekoehler@gmail.com
<@root> End of account list
So we’ll turn it on and follow the prompts to complete the oauth authentication:
<@christiek> account gtalk on
<@root> jabber - Logging in: Starting OAuth authentication
<jabber_oauth> Open this URL in your browser to authenticate: URL
<jabber_oauth> Respond to this message with the returned authorization token.
<@christiek>TOKEN
Visit the BitlBee wiki for instructions on how to setup other chat networks or Twitter.
Time to chat!
Once you’ve configured a chat account and are connected, you’ll see your contacts listed as you would regular IRC users.
To initiate a chat you can use IRC commands:
/query robert.mith

