Tag: Ubuntu

How to install BitlBee (IRC to chat and Twitter gateway) on Ubuntu

What is BitlBee?

bitlbee-logo

BitlBee enables you to connect to chat networks and Twitter via an IRC client and interact with those chat networks in the same way you interact with IRC.

Why would you want to do this? Aside from being neat, being able to connect to chat and twitter with your IRC client means there are fewer programs you have to run and keep track of and it enables you to use the keyboard to issue commands instead of the GUI.

Installation on Ubuntu

This post explains how to build BitlBee from source on the most recent Ubuntu LTS (12.04 Precise). There are packages for BitlBee, but they aren’t up to date.

Note: These instructions are for a single-user setup of BitlBee. If you are installing a server for multiple users, especially ones you don’t know well, please read the documentation to be sure you understand what you are doing and are selecting the most secure options.

Dependencies

You’ll need to make sure the following packages are installed on your system: build-essential, libglib2.0-dev. Additionally, you’ll need an ssl library and I recommend libgnutls-dev (over openssl, which can be problematic). And if you want to support off-the-record chat, you’ll need libotr2-dev.

You can install all of those with:

sudo apt-get install build-essential libglib2.0-dev libgnutls-dev libotr2-dev

Download, configure, and make source and install

wget http://get.bitlbee.org/src/bitlbee-3.2.tar.gz
tar -xzvf bitlbee-3.2.tar.gz
cd bitlbee-3.2
./configure --otr=1 --msn=1 --jabber=1 --oscar=1 --twitter=1 --yahoo=1 --ssl=gnutls --etcdir=/etc/bitlbee
make
sudo make install

The configure included above specify the following:

  • inclusion of msn, jabber, oscar (AOL), yahoo, and twitter protocols
  • enable OTR (off-the-record messaging)
  • gnutls as the ssl library
  • location of configuration directory as /etc/bitlbee

Configure BitlBee

Next you’ll need to configure Bitlbee for use.

First, create and then edit the sample conf file:

sudo make install-etc
sudo vim /etc/bitlbee/bitlbee.conf

Here are the important options to set:

  • RunMode: How the bitlbee server should run. Options include: Inetd, Daemon, ForkDaemon.
  • User: The user that bitlbee server should run as. bitlbee makes sense here.
  • DaemonInterface: Which network interface to use. The default should be fine.
  • DaemonPort: Which port to use. The default should be fine unless you’re already using it for IRC or ZNC (bouncer).
  • AuthMode: I recommend setting this to Open and then to Registered after you’ve registered yourself.
  • AuthPassword: Needed to login to closed systems. Generate a hashed password with bitlbee -x hash .
  • OperPassword: Unlocks operator commands. Generate a hashed password (see previous bullet).
  • ConfigDir: Make sure this is the same thing specific in the configure option. In this example, it’s /etc/bitlbee.

Here are the example conf directives:

RunMode = ForkDaemon
User = bitlbee
DaemonInterface = 0.0.0.0
DaemonPort = 6667
AuthMode = Open
AuthPassword = md5:SECRET_HASH
OperPassword = md5:SECRET_HASH
ConfigDir = /etc/bitlbee

Add bitlbee user

Now you need to create that system user and make sure it can read the conf file:

sudo adduser --system bitlbee
sudo chmod -R +r /etc/bitlbee

Start the server

Now run the server:

sudo bitlbee -c /etc/bitlbee/bitlbee.conf

Usage

Connect with your IRC client

Open your IRC client and add the bitlbee server just as you would any IRC server. Here’s what it looks like in X-Chat:

mybitlbee server in xchat

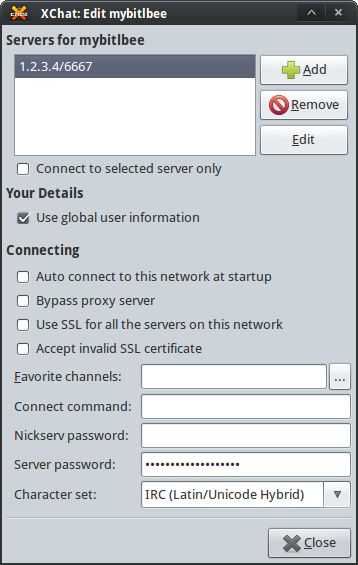
Server password will be whatever you put for AuthPassword in your bitlbee.conf. It doesn’t matter what you have for nickname, user name or real name. These will be used when you register with bitlbee.

Register your user

register <password>

You should then see

<@root> Account successfully created

On subsequent sign ins you’ll need to identify just like you do with NickServ:

identify <password>

Now that you’ve registered your user, it’s a good idea to change AuthMode to Registered in your bitlbee.conf.

Setup your accounts

When you first start BitlBee, you won’t have any chat or Twitter accounts so you’ll need to set them up.

<@christiek> account list
<@root> No accounts known. Use `account add' to add one.

So let’s setup gtalk:

<@christiek> account add jabber myemail@gmail.com
<@root> Account successfully added with tag gtalk
<@root> You can now use the /OPER command to enter the password
<@root> Alternatively, enable OAuth if the account supports it: account gtalk set oauth on
<@christiek> account gtalk set oauth on
<@root> oauth = `on'

Now the gtalk account is configured, but it isn’t turned on:

<@christiek> account list
<@root>  0 (gtalk): jabber, christiekoehler@gmail.com
<@root> End of account list

So we’ll turn it on and follow the prompts to complete the oauth authentication:

<@christiek> account gtalk on
<@root> jabber - Logging in: Starting OAuth authentication
<jabber_oauth> Open this URL in your browser to authenticate: URL
<jabber_oauth> Respond to this message with the returned authorization token.
<@christiek>TOKEN

Visit the BitlBee wiki for instructions on how to setup other chat networks or Twitter.

Time to chat!

Once you’ve configured a chat account and are connected, you’ll see your contacts listed as you would regular IRC users.

To initiate a chat you can use IRC commands:

/query robert.mith

How to Install Firefox and Thunderbird (Including Beta, Aurora & Nightly) on Ubuntu

One of the first things I do when setting up a new machine is install Firefox, Firefox Nightly and Thunderbird Aurora. There isn’t one source for all of these programs, and I always forget where to get each of them and how to make language packs work.

This article explains how to install the various releases of Firefox and Thunderbird on Ubuntu.

Overview of Firefox Builds

At any given time, there are four builds of Firefox available:

  • Release: Highly tested, relatively bug-free and stable. This is the build most people should use.
  • Beta: Needs a few final touches, but is otherwise stable and almost ready for prime-time. This build is for those who want a preview of upcoming features and are will to put up with a few minor bugs here and there.
  • Aurora: Aurora is a pre-Beta build. It’s most stable than a nightly, but not as stable as a beta. Use this build if you want a balance of cutting-edge features and stability.
  • Nightly: The most cutting-edge build you can get. It will have the most recent features, but might not be completely stable. Use this if you have a high tolerance for bugs.

Release

The most current release of Firefox should be available in the official Ubuntu repositories for all recent versions. As of the writing of this post, release from Quantal (12.10) to Precise (11.10) have Firefox 17, which is the current release version. The official repository for Raring (13.04), not yet released, has a beta build of Firefox 18.

Moreover, Firefox comes installed by default for these versions of Ubuntu. You shouldn’t have to do anything to install it. If you’ve un-installed it for some reason, you can install it with:

sudo apt-get install firefox

UPDATE 7 Jan: A commenter mentioned Ubuntuzilla, which I did not know about before. If you’re on a version of Ubuntu prior to 11.10 and want to install the current version of Firefox, this could be a good option for you.

Beta

A group called Mozilla Team maintains a repository for Firefox Beta (as well as and Thunderbird Beta).

To install from these repositories, first you have to add the ppa:

sudo add-apt-repository ppa:mozillateam/firefox-next

For Thunderbird, the command is:

sudo add-apt-repository ppa:mozillateam/thunderbird-next

Note: if your system doesn’t have add-apt-repository for some reason, try installing python-software-properties and if that doesn’t work then try installing software-properties-common.

Then update packages and install:

sudo apt-get update
sudo apt-get install firefox

Note: You’ll notice that this package name is the same as it is in the official repository. This means that you can’t have both installed at the same time. You can ‘pin’ a package to a given source and version, allowing you to install a specific version from a specific source. But, as long as the package names are the same, they can’t be installed concurrently. You’ll have to compile and execute one version from the source if you want to do this.

(If anyone knows how to re-name packages within a PPA, let me know how in the comments.)

Aurora & Nightly

Aurora & Nightly packages are maintained by Ubuntu Mozilla Daily Build team and there is one PPA for Firefox and Thunderbird nightlies, and then two other PPAs for the Aurora versions of each.

Installing Aurora versions:

sudo add-apt-repository ppa:ubuntu-mozilla-daily/firefox-aurora
sudo add-apt-repository ppa:ubuntu-mozilla-daily/thunderbird-aurora
sudo apt-get update
sudo apt-get install firefox
sudo apt-get install thunderbird

Note: See note in previous section regarding the limitations of packages with the same name.

Installing nightlies:

sudo add-apt-repository ppa:ubuntu-mozilla-daily/ppa
sudo apt-get update
sudo apt-get install firefox-trunk
sudo apt-get install thunderbird-trunk

You’ll notice that the packages names for both Firefox and Thunderbird are appended with ‘-trunk’. This means you can install and run nightly versions along side release, beta or aurora. In fact, this is what I do. I install and use release and nightly.

Installing Locales / Language Packs

For whatever reason, I’ve had a lot of trouble getting other locales to work with Firefox on recent versions of (X)Ubuntu. I always try installing the relevant language pack from the official repository. Packages like language-pack-de and language-pack-es should install everything you need for those locales, including the language packs for Firefox. But it never works. Here’s a method I’ve found that reliably works, at lease in 12.10.

Install your desired language pack xpi from:

You’ll also need to set your preferred language for displaying pages.

  1. In Firefox, open Preferences > Content.
  2. Under Languages press Choose.
  3. If you don’t see your desired language, click Select a language to add… and add one.
  4. If this doesn’t work, open about:config and set general.useragent.locale to your desired locale.

Almost there. Firefox will select the language pack to use based on what the system language is. If you’re not sure what your locale is, type this in a prompt:

printenv LANG

In my case, I get:

en_US.UTF8

This presents a problem because I don’t want to have to change the language for my entire system just to test another locale in Firefox. Luckily, there’s a solution.

You can start Firefox from the command line and specific the LANG environmental variable:

LANG=es_ES.UTF8 firefox

If you want to change the menu and/or or launcher command, you would use:

sh -c "LANG=es_ES.UTF8 /usr/bin/firefox-trunk %u"

Troubleshooting

I tested the above procedures on Xubuntu 12.10 with both Firefox release and nightly (trunk). If you have trouble with other configurations, let me know.

If you install a language pack that renders Firefox unable to start, start it in safe mode and remove the language pack. From the command-line, issue:

firefox --safe-mode